As you can see in my earlier post, I was inspired to make a blanket like one I saw in photos. There was no pattern and I didn’t know the designer. This is the version I started on, before being asked by my Crochet Group for the pattern as a group project.
Designed by Charlene Boardman
Pdf Here
I use US Crochet Terminology
Stitches used: Sc, dc, tr, ch, ss
Tunisian Entrelac
Materials:
I used Kismet Lollipop Double Knit which comes in 300m/100g Balls
300m each of Dark, Medium and Light Pink
300m Light Green
600m Cream
4mm Hook
Yarn needle
Gingham squares: Tunisian Entrelac
Gingham Blocks are made using the Tunisian Entrelac method of squares that change colour after each square. You can carry your yarn behind your work when not in use. If you prefer, you can crochet over the yarn. If that becomes too complicated, cut yarn between squares and work ends in once completed. Keep your tension loose so you do not distort your square.
 A: Dark Pink squares in the corners
Follow the diagram for placement of colours (Dark, Medium, Light), and placement of next square (1-25). As you can see you will be growing diagonally.
| Tier 5 |
15 d |
19 m |
22 d |
24 m |
25 d |
| Tier 4 |
10 m |
14 l |
18 m |
21 l |
23 m |
| Tier 3 |
6 d |
9 m |
13 d |
17 m |
20 d |
| Tier 2 |
3 m |
5 light |
8 m |
12 l |
16 m |
| Tier 1 |
1 dark |
2 medium |
4 d |
7 m |
11 d |
Number is the order of the square to make in Tunisian stitch
D – dark pink
M – medium pink
L – light pink
Foundation: (1) Chain 4 in Dark pink,
- Pick up a loop from each chain on your hook, and leave the loop there: *Insert hook through top of your chain, YO, pull through* repeat 3x (4) Forward row
- YO, pull through 1st loop, *YO, pull through 2 loops* repeat twice (Return row)
- Pick up a loop from each vertical stitch from row just made, and leave on hook like you did in 1st (4) Forward Row
- Repeat Row 2.
Repeat these rows until your block is a square. Some hookers may make 3 rows, some may make 4 rows, it depends on your tension.
- Final row will be a Forward Row: *Pick up loop, YO, pull through both loops on hook*. Please do not ‘cast off’ tightly or your square will be oddly shaped. End off and cut yarn
Blocks that begin a new Diagonal: 2 Medium, 4 Dark, 7 M, 11 D:
- Join new colour to bottom right corner with a slip stitch pulled tight. This is to attach your yarn only, not make a stitch. Chain 4 and continue in the same way as Block 1. When you get the dark pink block join them by inserting your hook into the last stitch of row 1 just above the slip stitch where you joined the new yarn. YO, pull through.
- *YO, pull through 2 loops* to end.
- Repeat Forward row by picking up 3 loops, and join to dark pink block, by inserting your hook into the last stitch of row 2. *YO, Pull through 2 loops* repeat to end.
- And 5. Repeat Row 1 and Row 2 until your blocks are the same height.
- Repeat Final row as with Block 1. End and cut yarn.
Subsequent Blocks: 3 Medium : 5 Light, 6 Dark: 8 M, 9 M, 10 M: 12 L, 13 D, 14 L, 15 D: 16 M, 17 M, 18 M, 19 M: 20 D, 21 L, 22D : 23 M, 24 M: 25 D)
- Join new colour to same stitch where you ended the block just completed.
- Continue in pattern for subsequent blocks, but do not make chains to begin, you simply pick up loops from the final loops of the block below, in your 1st row of a new block. Remember you have to join the new block to the one on the left.
B: Light Pink Squares in the corners.
| Tier 5 |
15 l |
19 m |
22 l |
24 m |
25 l |
| Tier 4 |
10 m |
14 d |
18 m |
21 d |
23 m |
| Tier 3 |
6 l |
9 m |
13 l |
17 m |
20 l |
| Tier 2 |
3 m |
5 d |
8 m |
12 d |
16 m |
| Tier 1 |
1 l |
2 m |
4 l |
7 m |
11 l |
Follow the diagram for placement of colours (Dark, Medium, Light), and placement of next square (1-25). As you can see you will be growing diagonally.
Foundation: (1) Chain 4 in Light pink.
- Pick up a loop from each chain on your hook, and leave the loop there: *Insert hook through top of your chain, YO, pull through* repeat 3x (4) Forward row
- YO, pull through 1st loop, *YO, pull through 2 loops* repeat twice (Return row)
- Pick up a loop from each vertical stitch from row just made, and leave on hook like you did in 1st (4) Forward Row
- Repeat Row 2.
Repeat these rows until your block is a square. Some hookers may make 3 rows, some may make 4 rows, it depends on your tension.
- Final row will be a forward row: *Pick up loop, YO, pull through both loops on hook*. Please do not ‘cast off’ tightly or your square will be oddly shaped. End off and cut yarn
Blocks that begin a new Diagonal: 2 Medium, 4 Light, 7 M, 11 L:
Join new colour to bottom right corner with a slip stitch pulled tight. This is to attach your yarn only, not make a stitch. Chain 4 and continue in the same way as Block 1. When you get the dark pink block join them by inserting your hook into the last stitch of row 1 just above the slip stitch where you joined the new yarn. YO, pull through.
- *YO, pull through 2 loops* to end.
- Repeat Forward row by picking up 3 loops, and join to dark pink block, by inserting your hook into the last stitch of row 2. *YO, Pull through 2 loops* repeat to end.
- And 4. Repeat Row 1 and Row 2 until your blocks are the same height.
- Repeat Final row as with Block 1. End and cut yarn.
Subsequent Blocks: 3 Medium: 5 Dark, 6 Light: 8 M, 9 M, 10 M: 12 D, 13 L, 14 D, 15 L: 16 M, 17 M, 18 M, 19 M: 20 L, 21 D, 22 L: 23 M, 24 M: 25 L)
- Join new colour to same stitch where you ended the block just completed.
- Continue in pattern for subsequent blocks, but do not make chains to begin, you simply pick up loops from the final loops of the block below, in your 1st row of a new block. Remember you have to join the new block to the one on the left.
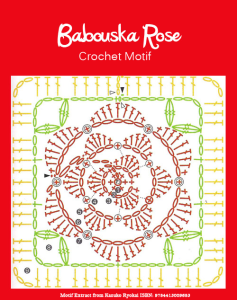
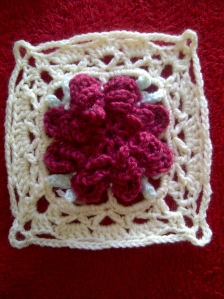
Stacy’s Flower Square
Designed by Charlene Boardman
MATERIALS:
DK yarns in 3 shades, plus centre of flower colour (optional)
300m Cream yarn for borders and join
Green DK yarn for leaves
5mm hook
Tapestry needle to weave ends in securely
INSTRUCTIONS: Make roses in all 3 shades.
Foundation: Magic Ring
- Ch 4 (counts as 1 dc, ch 1), * 1 dc into ring, ch 1 **; repeat from * to ** 7 times. Join with a sl st into 3rd ch of the ch-4 made at the beginning of this round. (8 ch-1 sps) Cut yarn
- Join petal colour into any of the ch-1 spaces with a slip stitch, ch 1, * 1 sc, 3 dc, 1 sc ** into the same ch-1 space; repeat from * to ** into the next 7 ch-1 spaces. Join with a sl st into the first sc of the first ch-1 space. (8 petals)
- Chain 4, working behind petals, skip 1st petal, *slip stitch in next ch 1 sp, ch 4, skip next petal, repeat from* around. Join with slip stitch to beg chain 3 (8 ch 4 sps)
- Ch 1 and work * 1 sc, 5 dc, 1 sc ** into the first ch-4 space and repeat from * to ** into all the next ch-4 spaces; sl st into the first sc of the first petal made in this round. You should now have another 8 petals behind the first 8 made.
- Repeat Row 3 for another round of petals..
- Ch 1 and work * 1 sc, 5 dc, 1 sc ** into the first ch-4 space and repeat from * to ** into all
the next ch-4 spaces; sl st into the first sc of the first petal made in this round. You should
now have a 3rd round of 8 petals. Cut yarn.
- Join green yarn between any 2 petals with a sc. *Ch 6, sc into 4th ch from hook, hdc into next
ch, dc into next ch, slip stitch into sc between petals. Repeat for 2nd leaf. Chain 4, sc between
next petals.* repeat. (4 pairs of leaves, 4 ch 4 sps). Cut yarn.
Celtic Lace Border
Celtic Lace Join link
- Join cream with *(sc to the tip of 1st leaf of any pair , Chain 3, sc to tip of 2nd leaf). Chain
5, dc into sc between 2 petals of row 7, ch 5* repeat to end. Join with slip stitch to 1st Ss into corner ch-loop.
- *3sc into corner: 6sc into 5-ch loop of previous row, 6sc into 5-ch loop of previous row* repeat all around. Join with slip stitch to 1st
- Beg dc into same st as join, dc into same st, ch 2, skip sc, 2dc into next sc. *V-stitch – dc, ch 3, dc into middle stitch of 5dc group; dc, ch 3, dc into stitch between 5dc groups; dc, ch 3, dc into middle stitch of 5dc group. (Corner – 2dc into 1st sc, chain 2, skip sc, 2dc into next sc)* repeat all around. Join with ss into top of ch-3. SS to corner ch-loop.
- Beg dc, 2dc, ch 2, 3dc into corner space. *5 dc into each 3-ch space across side (ie: the top of the V-stitch); (3dc, chain 2, 3 dc)* Repeat all around. Join with ss into top of ch-3. Ss to corner space.
CELTIC LACE JOIN: (https://cypresstextiles.net/2016/01/09/celtic-lace-join/)

NB: please note the chains in the corners and in final row may need to increase or decrease according to your tension. Your block must lie flat and square.
Celtic Lace Border:
- Join in top corner of Gingham square A or B – ensure the stripes of each block are vertical. Do not make stitches tight and ‘gather’ the block *(Corners: 3sc) 9 Sc evenly spaced in every side between the corner 3sc; keep tension loose so block lies flat, if your sc is too stretched, add in 1 ch between each sc.* Join with ss in 1st (corners: 3sc, 9 sc between corners)
- Begin in corner with 3 ch, dc in 1st sc, ch 3 and skip middle sc, 2dc in next sc: *Corners: (2dc into 1st sc, ch3 and skip middle sc,, 2dc into 3rd sc) Skip 1st sc, (V-stitch: Dc in next st, ch3, dc into same st; skip 2 sc) repeat 2x, skip 1sc* Repeat for each side, end with ss into top of 1st st dc in corner, ss into corner space.
- Begin with 3ch for 1st dc, 2dc, 2ch, 3dc into ch-3 space. Corners: (3dc, ch2, 3dc). *5dc into ch3 repeat Make corner.* Repeat for each side, ending with invisible join or ss into top of ch3, Fasten off.
Celtic Lace Joining the Blocks:
This next Row is the actual join but you do this row alongside and with other blocks.
Make sure your block lies flat and 5ch loops are long enough so block is square.
Make sure the Tunisian Entrelac blocks have the ‘stripes’ going vertical.
- ***(sc, chain 5, sc) all in corner space. chain 5, (sc in centre dc of next 5dc group,
chain 5) to end of side.***
Repeat from *** to *** 3 more times. Join with a slip stitch in the beginning sc.
First motif complete! Now you will be joining the subsequent motifs on the final
round of the lace.
- Start next block in bottom right corner with (sc, chain 5, sc) all in corner space. Do NOT join the bottom corners together. (Chain 2, join to ch-5 loop with a chain stitch enclosing the loop, chain 2 and sc in middle dc of 5dc group.) repeat to 2nd
Chain 2, join to 1st block’s 5ch loop corner in the same way as above, and sc in same corner. Complete block on other 3 sides in same way as 1st block.
- Complete the row in the same way as step 2.All the top blocks are now complete on all four sides. All top corners are joined together, but the bottom corners are NOT joined yet. You are leaving these two corners un-joined because this is an area where 4 motif corners meet. On your next row of squares, these un-joined corners will be picked up by their diagonal corner buddies. In other words, they will be “reaching” across diagonally to each other, forming an X. Continue on with each consecutive block.
ROW 2
- Start 2nd row in bottom right corner with (sc, chain 5, sc) all in corner space. Complete 1st side as in step 1 and join the 1st corners (Chain 2, join to ch-5 loop with a chain stitch enclosing the loop, chain 2 and sc in same corner.
Join the 2 rows: (Chain 2, join to ch-5 loop with a chain stitch enclosing the loop, chain 2 and sc in middle dc of 5dc group.) repeat to 3rd corner. Chain 2, join to the diagonally opposite block’s corner loop with a chain, ch 2, sc into corner.
Complete block as in Step 1 on next two sides.
- Start next block in bottom right corner with (sc, chain 5, sc) all in corner space. Do NOT join the bottom corners together. (Chain 2, join to ch-5 loop with a chain stitch enclosing the loop, chain 2 and sc in middle dc of 5dc group.) repeat to 2nd corner.
Chain 2, join to diagonally opposite corner’s 5ch loop corner with 2ch, joining chain, and sc in same corner. Complete block on other 2 sides.
- Complete the row in the same way as step 2.
Complete blanket in the same way, just remember to join bottom row corners in the same way as top row’s top corners.
Order of Joining
Join your squares according to this diagram. Sizes in cm and inches is indicated, as well as number of squares of each type A Block, B Block and F Flower block in 3 different colours.
Baby Cot Afghan: 76×107 cm/30×42″ – 5×7=35 Blocks
Baby Cot Afghan: 76×107 cm/30×42″ – 5×7=35 Blocks
| A |
Fdp |
A |
Fdp |
A |
| Fmp |
B |
Fmp |
B |
Fmp |
| A |
Flp |
A |
Flp |
A |
| Fdp |
B |
Fmp |
B |
Flp |
| A |
Flp |
A |
Flp |
A |
| Fmp |
B |
Fmp |
B |
Fmp |
| A |
Fdp |
A |
Fdp |
A |
| A |
12 |
10 |
|
|
| B |
6 |
6 |
|
|
| F |
17 |
|
|
|
| Total |
SQUARES |
|
35 |
Flower Dark Pink 5
Flower Medium Pink 7
Flower Light Pink 5
Lapghan: 92x140cm/36×55″- 6×9=54 Blocks
| A |
FDP |
B |
FDP |
A |
FDP |
| FMP |
B |
FMP |
A |
FMP |
B |
| A |
FLP |
B |
FLP |
A |
FLP |
| FDP |
B |
FMP |
A |
FLP |
B |
| A |
FLP |
B |
FLP |
A |
FLP |
| FMP |
B |
FMP |
A |
FMP |
B |
| A |
FDP |
B |
FDP |
A |
FDP |
| FDP |
B |
FMP |
A |
FLP |
B |
| A |
FMP |
B |
FMP |
A |
FMP |
| A |
14 |
|
|
|
|
| B |
13 |
|
|
|
|
| F |
27 |
|
|
|
|
| Total |
SQUARES |
|
|
54 |
| FDP |
8 |
|
|
|
|
| FMP |
10 |
|
|
|
|
| FLP |
8 |
|
|
|
|
Twin Bed Afghan/Throw: 8×11 – 123×200 cm/48×84″ – Blocks 88
| A |
FDP |
A |
FDP |
A |
FDP |
A |
FDP |
| FMP |
B |
FMP |
B |
FMP |
B |
FMP |
B |
| A |
FLP |
A |
FLP |
A |
FLP |
A |
FLP |
| FDP |
B |
FDP |
B |
FDP |
B |
FDP |
B |
| A |
FMP |
A |
FMP |
A |
FMP |
A |
FMP |
| FLP |
B |
FLP |
B |
FLP |
B |
FLP |
B |
| A |
FDP |
A |
FDP |
A |
FDP |
A |
FDP |
| FMP |
B |
FMP |
B |
FMP |
B |
FMP |
B |
| A |
FLP |
A |
FLP |
A |
FLP |
A |
FLP |
| FDP |
B |
FDP |
B |
FDP |
B |
FDP |
B |
| A |
FMP |
A |
FMP |
A |
FMP |
A |
FMP |
| A |
24 |
|
|
|
FDP |
16 |
|
| B |
20 |
|
|
|
FMP |
16 |
|
| F |
44 |
|
|
|
FLP |
12 |
|
| Total |
SQUARES |
|
|
|
|
88 |
Final Border:
Begin in any corner: *3 sc, 3 chain, 3 sc in corner. In each 5-ch loop make 3 sc, 3 ch, 3 sc. Where 2 corners meet make 3 sc in one 2-ch loop, 3 ch, 3 sc in next 2-ch loop. continue all around the border in this manner. Slip stitch into 1st sc to join and FO. Weave in all loose ends.

PDF here