Owl Baskets

The Nursery Theme is Owls
Wise
Intelligent
Beautiful
Perfect for a little princess to aspire to

These Owl Baskets will hold all the little things
on the Changing Table
to keep it neat and tidy
while everything is right to hand

I did change up the large basket a little from the linked pattern, but didn’t make notes.
The other two baskets, I just started with a circle to the size I wanted
and then made the sides as high as required.

Large owl basket link:
http://www.ravelry.com/patterns/library/owl-basket-2
It is a paid pattern

Craft Mania

The trip to UK and Italy has lit a fire in me!

I haven’t stopped crafting since getting home 22 May.

I’m having a ball!!

I’ve made hats and earwarmers

3 hats and 2 earwarmers (1) (640x427)

4 pairs of fingerless gloves

2 scarves

made 2 diaper cakes

IMG-20140226-00346 IMG-20140226-00350

3 pairs of booties

DSC_3029 (2) (640x427)

a faux-fur throw

a baby receiving blanket

Potchefstroom-20141004-01178 (2)

a Taggie Teether, or more

20140217_134508 Taggie teether

a Bear Cumfie Blankie

Teddy Cumfie

2 stuffed toy rattles: a car and a train

4 Altered Bags

a Cable knit bag

Cable-knit handbag with leatherette band

produced a 30 page photo-book on my travels

made baby clothes

crocheted baby clothes

made toys and baby accessories

made Christmas presents and decorations

and I’m still busy :-)!
I’ll be posting photos soon

Crochet Hook case with Tutorial

Materials:

Variegated Ribbon Thread

3mm Hook

25cm x 20cm piece of complementary fabric

80cm x 1cm wide ribbon

80cm x 2cm wide ribbon

Method:

Chain 52.

1. Treble into 2nd ch from end. Treble into each st. Chain 1, turn

2. Dc into each st. Chain 2, turn.

3. Continue to alternate treble and dc rows until work measures 30cm long. FO and sew in ends.

Cut 2 pieces of fabric 25cm x 10cm. Sew across either width end of crochet work, this will prevent crochet hooks from poking through the crochet case.

Fold up bottom, fabric-edged width in half, to form a 5cm pocket fold. Sew outer edges closed.

inside roll

inside roll

Cut a length of 1cm ribbon to fit across width of case. Sew ribbon edge to case edge about 15cm down from top edge. Weave ribbon back and forth through 2 treble stitches at a time, from the one side to the other. Secure the end of the ribbon at the side of the case.

Weave the balance of the 1cm ribbon, loosely, through every 2nd treble stitch along the same line, leaving an equal length (about 15cm) of ribbon at either end, starting and stopping about 3cm from the edge on the outside of the case.. This is to tie the rolled case closed.

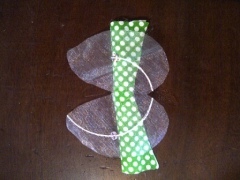
At about 2cm above top of the flap pocket, secure the 2cm wide ribbon to the edge of the case, and weave through every 2nd treble starting at the same side as 1st ribbon, so that the loops made match up. Secure the ribbon on the other edge.

Weave the balance of the 2cm ribbon, loosely, through every 2nd treble stitch along the same line, matching the ribbon loops to the 1cm ribbon loops. Start and stop the weaving about 3 cm from edge, as with the 1cm ribbon, leaving the loose lengths on outside of case to tie the rolled case closed.

close-up of ribbon

close-up of ribbon

Finishing:

Do a scalloped edge around the whole case. Join thread at the top right edge of the flap pocket [Sl st, dc, treble, dc, sl st] all the way across the top of the flap, down the left side to the bottom, continue along the bottom, up the side, across the top, and down the left side, FO at the top of the flap pocket.

Finally, secure your flap pocket to the crochet case every 4 trebles keeping your pockets even with your ribbon loops. Decide where your sewing needles will be placed and make sure there is a pocket wide enough to fit.

Slip your embroidery scissors behind the 2cm ribbon and then into the flap pocket. Tie a length of ribbon thread about 1cm above the 2cm ribbon loop long enough to tie through the finger holes of your embroidery scissors to secure them to the case.

Then place your crochet hooks into place, 1st behind the 1cm ribbon loop, then the 2cm ribbon loop and into the flap pocket. You can fit 2-3 thin hooks into the same loops if you have a lot of hooks. Cut an eraser in half to be used over the very thin tips of your thinnest hooks for protection. Use the other half to push the sharp ends of 3 large-eyed needles into it, and push the eraser into the pocket too.  

Attach a wound-up measuring tape to the top flap with a safety pin, and pin all your stitch/row counters (or tiny safety pins) along the front of the flap too.

Keep a pen or pencil in your case, through the loops. I also keep Amigurumi stuffers (the green ‘forks’) through my loops.

TO CLOSE

Fold top flap over your hooks. Roll each side piece in once, then the two sides again to meet in the middle and tie your ribbons in a bow.

hooks, stuffers (Amigutumi) and pen

hooks, stuffers (Amigutumi) and pen

Crochet Hook Roll

Crochet Hook Roll

Angelic Choir Tutorial

ANGELIC CHOIR

 Marga this little Negro Angel is for you

IMG-20130109-03047

Bead or polystyrene ball for head
Light and dark flesh coloured stocking
Red and green felt or other fabric for dress
Net or feathers for wings
Wool for hair
Bead eyes
Paper for songbooks
White felt for gloved hands
Polyester stuffing

PATTERN

IMG-20130109-03048

Cut out dress and sleeves.
Insert bead or ball in flesh coloured stocking, tie off and cut a ‘neck’.
IMG-20130109-03039

Insert into neck of dress and close back.
Sew or glue back and arm seams.

IMG-20130109-03040

 Sew or glue wings to back of the sleeves,
then sew or glue sleeves at shoulder height and slightly around sides of dress.
Sew or glue gloves into place and sew or glue song book onto one or both hands.

IMG-20130109-03041

Wrap wool around two fingers, and tie in the middle.

IMG-20130109-03043

Cut opposite the tie.

IMG-20130109-03044

Put glue on the back and sides of the head, and glue wool ‘wig’ in place,
ensure the strands are equally spread. Trim

IMG-20130109-03045

Stuff dress lightly with polyester stuffing to give shape.

IMG-20130109-03047

Attach a loop to top of head to hang from tree.

 Related articles

My Christmas Crafts: Snowman Tutorial

SNOWMAN

IMG-20130109-03038

Cut a saucer sized piece of white net – body
Cut a Coffee cup rim sized piece of net – head

IMG-20130109-03049

Sew small running stitches into the edge of the net and leave a tail to close.

IMG-20130109-03030

Take a large piece of polyester stuffing, form into a ball,
place into middle of net and gather top together and knot thread to hold.
Repeat with the head.

IMG-20130109-03031

Sew the two balls together tightly.
Pinch a piece of net and stuffing down the side and sew a line of stitches to represent arms.

IMG-20130109-03033

 Take 2 or 3 long threads of red, green and white wool, tie a knot at one end,
and plait the strands together to make a long scarf for your snowman.
Tie the other end in a knot.

IMG-20130109-03034

 Glue or sew on bead eyes, and orange coloured nose and smiling mouth.

IMG-20130109-03036

 Wrap and tie on the scarf. You can add a hat if you like.

IMG-20130109-03038

Make a loop of thread at the top of his head to hang him from the tree,
or insert an opened paper clip into the top of his head to hang from.

  Related articles

My Handmade Christmas

Well, as most of you know,
I have been laid-up for 8 weeks, with my broken ankle;
non-weight-bearing and  elevated above heart and hip.

It has been the perfect opportunity to get creative.
That is, once the depression and “poor-me” wore off!
These are some of the things I decided to do.

The Grandies especially enjoyed them
and the Christmas Tree looked great.

I crocheted my niece a bobbly scarf,
taught Whitney to bake spicy biscuits and fudge,
and decoupage herself a salt box
to hold her handmade lavender bath salts.

Creative, productive and thoroughly enjoyable!

BTW I hope to do some tutorials on these and other crafts this year! Lol

Related articles

A New Adventure

I’ve been working on a project, when I have the time, with great excitement!
But first a little background. July 18th or 67 Minutes for Madiba is a national Community Service Day in South Africa.  Nelson Mandela served 67 years of his life for the world, and its our way of extending that in his honour.
This year we celebrated with cakes and cooldrinks at 3 parties. The Farm Primary School with 50 children; our 34 Farm Workers; and 20 older folk, caretakers and tots in our farm village.  As part of the celebration the children got new winter school uniforms and shoes, and the littlies got tracksuits.
One of the mums came with me to buy everything. Betty is great. We talked about the young women in the village, I have wanted to teach them to sew, knit and crochet for their children particularly, but also as a means to earn money. Betty is thrilled and says she’d be happy to be translator and co-teacher. We also talked about a preschool for the littlies in the village. She will teach if I help.
I’ve invested in a Home School Program, and stocked up on supplies. Some things will be made by the villagers. We need a playground, a veggie patch, a hen house, and certain supplies like bean bags, dolls and soft toys, blankets, curtains, aprons, etc will be made by moms as part of the Adult Learning Program. There is also a need for Adult Literacy lessons.
We have a large Hall used for Church, Gatherings, etc which will be used for both projects.
We were supposed to start this week, but I’m confined to bed!
Drat! I’m excited!

Posted with WordPress for BlackBerry.

Sewing Ragbooks

Sewing for little boys means thinking out-of-the-box.
So, I came up with making them Ragbooks.
These are like my Playmats,
Tactile, Auditory and with hidden surprises!